
Asus Lamborghini VX5 Rescue
On the last day of the year (2017), I woke up early, and thought I would get in a bit of hacking before the family woke up. My machine is an ancient, second-hand Asus Lamborghini VX5, which I inherited from the wife when the screen broke (it stays in the office, and I use an external monitor, so the broken screen is not a problem. Also, it's only kind of broken - it works some of the time). It worked great for 7 years, but the fan got noisy a while back, and I'm using that as an excuse to buy a new one. It get's very hot even with the fan running, and once the fan dies, I can't imagine it will be long before something melts. I generally leave it running all the time, and only restart every couple of months, usually after updates, and on that morning I figured I would do a quick update+restart before getting into it.
I shut it down, and went to get the coffee machine going. Coming back up, the lights were on, but there was nobody home. Various lit-up LEDs showed that there was something going on, and the screen was thinking-about-booting-black, not no-power-off-black. It's never a good sign when the screen stays black for more than 10 minutes while booting…
Usually, when it powers up, the BIOS kicks in very quickly, handing over to Ubuntu goodness within seconds. Not this time. No BIOS, no Ubuntu, and nooo happy early morning hacking. Also, no prospect of bill-paying and loss of data looming. Yes, I have backups, and yes, I am certain the restore will work, but I want to enjoy shopping around for a new PC, not rush in because I need it.
Googling for possible causes (I hate problem solving per smartphone), I refreshed my memory:
- The BIOS is a program
- No matter what OS you run, your PC has a small program, the BIOS, which gets everything going (harddrive controller etc.) and then hands over to the OS, which runs on your harddrive, and hence cannot do anything without the harddrive controller.
- The CMOS is a memory technology
- The term is used for the chip that the BIOS uses. If the state on the CMOS goes bad, the BIOS gets confused, and bad things can happen, like the boot process grinding to a halt.
- You can reset a FUBARed BIOS by disconnecting and reconnecting the battery to the CMOS
- There is a small battery in the computer which powers the CMOS, keeping it alive. Disconnect this battery, and the state gets lost, and the BIOS gets to start from scratch.
More googling indicated that I am the first person to ever have this problem with an Asus Lamborghini VX5. It seems to happen often enough with Asus computers, and there were detailed guides about how to fix it (if this was indeed my problem) on other computers. After considering my options, which were: 1) Give up and throw the laptop and a month's worth of data-delta in the lake, or 2) Take the laptop apart and try to fix it.
I opted for the second, which seemed to have a slightly non-zero chance of success. I have taken computers apart before, and the results have never been pretty.
So without a plan, I started removing screws from the back of my VX5. Since the internet provides no clue about what to expect, here goes:
Prepare to Unscrew Lots of Easily Lost Tiny Screws
You need a level, clear surface which is big enough, and dedicated to the task at hand until you are done. You don't want to have to clear it for lunch in the middle of it all (and this could take a while). Close the lid, unplug all cables, particularly the power cable. Flip it over (so the bottom is up), and find a Philips ("star"?) screwdriver which grips the small screws easily. Prepare a small container to keep the screws in, several if you want to remember which ones go where - they are not all the same length, so you might want to be careful about putting each one back where it came from. Since I didn't plan on keeping this PC for long even if I managed to fix it, I just poured all the screws in one container.
Remove the Easy Stuff
First, the battery goes. While messing about with uncovered electronics, power sources are a bad idea. Also remove the CDROM drive - there are a couple of screws, but this is meant to be something anybody might want to do, so it's fairly straightforward.
Remove the Outer Plastic Shell
Remove all the visible screws at the bottom, until the outer plastic shell can be removed. Once they are all out, the cover comes off easily, so if it doesn't, don't force it, double-check that you didn't miss any. When the cover is off, remove the fan and clean it - I was amazed that my fan was moving at all, considering the amount of black stuff it contained.
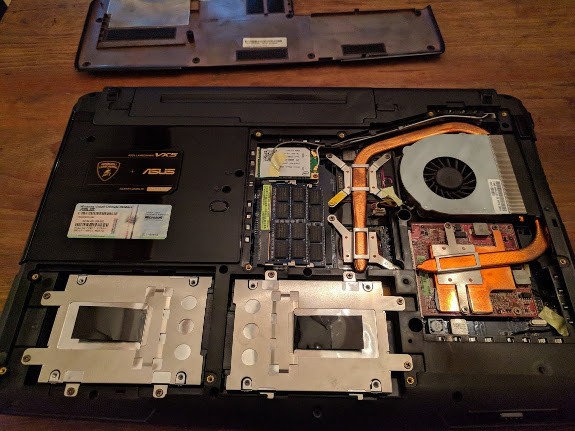
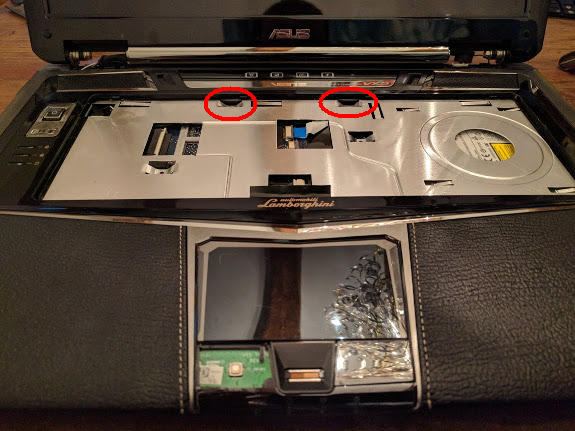
Remove the Top Shell
Remove all screws at the bottom which were uncovered when removing the plastic shell. Also, remove the three bits of rubber which are stuck in holes at the front edge - they cover screws which must be removed too. Flip the PC again, and get a screwdriver into the four flat holes above the keyboard, until it clicks out - this will allow the keyboard to be removed, and there are two screws along the top underneath that need to go. Now the top shell should come off with a bit of gentle convincing.
Do Not Touch the Screen!
It was a relief to realize I didn't need to get near the screen. Of course, I only realized this after I had removed the covers and screws where the screen is attached, but it was nice to know that I needn't have bothered.
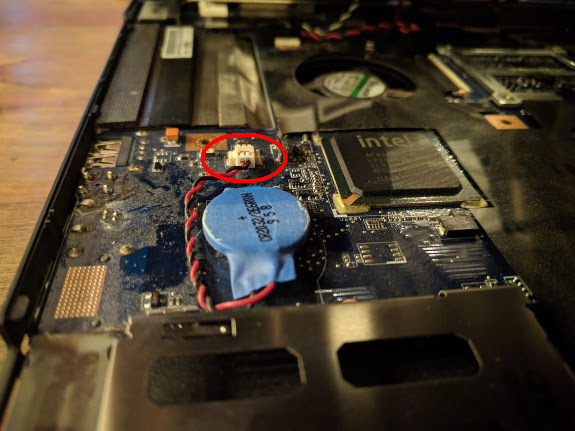
Disconnect CMOS Battery
With the top uncovered, the CMOS and it's battery are on the left side. My battery is a CR2032, encased in some kind of blue goo (I wonder how you're meant to replace it if it ever goes flat? Oh well, mine was still making a difference after many years of service, so maybe they don't?), with a connector attached which could be easily disconnected. I left it disconnected for a couple of minutes, just because, and took the time to press an important-looking small white button at the front which I afterwards realized was the left mousepad button. I'm sure this made no difference at all, but it looked important with all the uncovered electronics.
Put It All Back Together
After reconnecting the battery, put everything back together (reverse of above). Since I'm getting rid of this heap ASAP, I just put in enough screws to reasonably hold it together, so I had a pretty little pile of metal left over. I admit I was very surprised when I powered it up again, and it ran as well as before, spluttering fan and all. It's been running fine for a couple of weeks now, and the replacement is on the way. :-)